Friday 25 April 2014
vanilla chiffon cake
Life hasn't been all that sweet lately. Literally. Just when I thought I had put the morning sickness behind me and started enjoying food again, I found out I had developed gestational diabetes. Devastating news, really, for someone who loves carbs. I was under strict orders to stay away from white bread, chocolate and desserts...basically all the good things worth living for. Seriously, if you thought dentists were evil, wait till you meet a dietician. At least we never tell our patients to lay off the sweets completely.
Needless to say, my kitchenaid has once again gone back into storage. Deprived of chocolate and my favourite past time, I think it was the first time I felt upset about being pregnant. (Morning sickness is a piece of cake compared to this.)

This chiffon was done back in happier times. It was my first attempt at a chiffon cake and I was a little disappointed that it didn't rise as much as I had expected. Eventually figured out it was because the sugar amount listed in the recipe was wrong which led to a wonky meringue. I've corrected it in the recipe below.
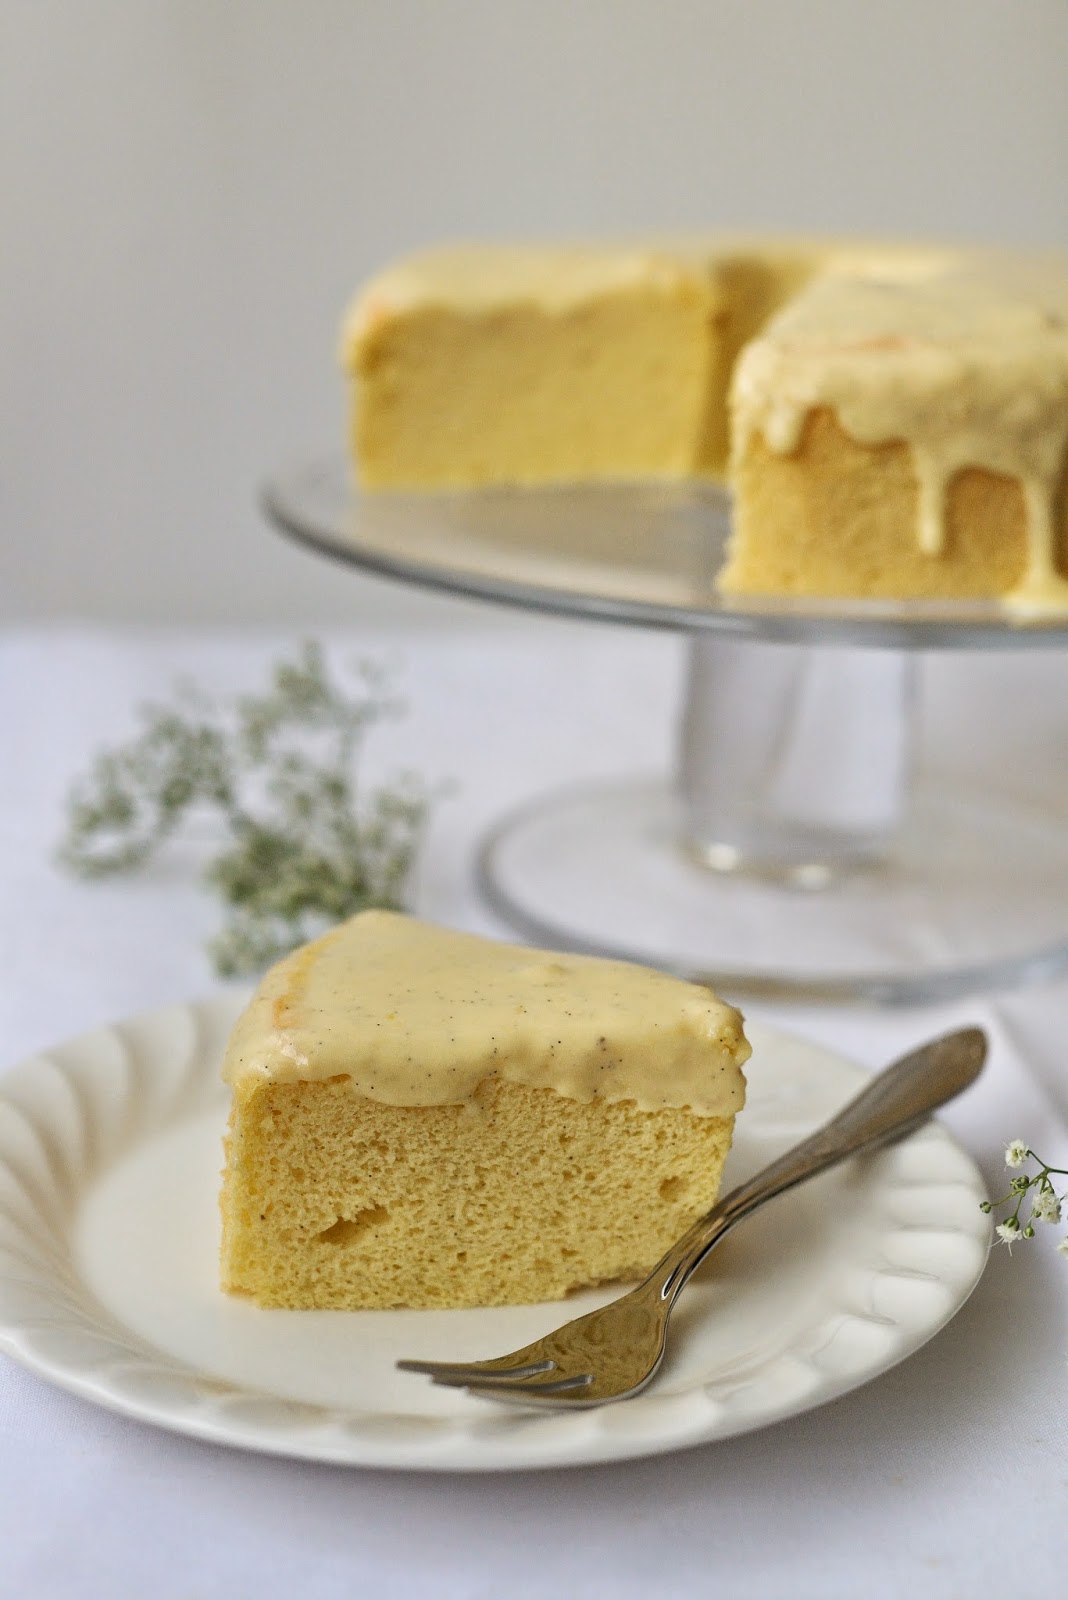
Please excuse the uneven bubble size. Like I said, this was my first attempt.

Vanilla Chiffon Cake
(adapted from Keiko Ishida's Okashi: Sweet Treats Made with Love)
Ingredients
80g top flour (sifted twice)
5 egg yolks
20g caster sugar
60g water
60g canola oil
seeds scraped from 1 vanilla bean or 1 tsp vanilla extract
(for the meringue)
90g caster sugar
10g corn flour
5 egg whites
Directions
- Preheat oven to 160°C.
- Beat egg yolks and sugar together in a mixing bowl.
- Add in water, canola oil and vanilla and continue mixing.
- Add flour and mix until well combined and batter is sticky. Set aside this egg yolk mixture.
- Combine sugar and corn flour in a bowl.
- In a separate mixing bowl fitted with whisk attachment, beat egg whites until foamy.
- Add half of the sugar-corn flour mixture and continue whisking for a few minutes.
- Add remaining sugar-corn flour mixture and whisk until glossy, stiff peaks are formed.
- Gently fold in 1/3 of meringue into egg yolk mixture first, then add in the remaining 2/3 meringue and fold to incorporate completely. Do this gently to avoid destroying the meringue bubbles.
- Pour batter into ungreased 21cm chiffon pan and bake in the oven for 40-50min.
- When cake is done, remove from oven and turn the pan over, leaving to cool on a wire rack upside down.
- Once cooled completely, run a knife or spatula around the edges to loosen the cake from the pan before inverting onto wire rack.
*I coated my chiffon cake with crème pâtissière because I love the stuff but you can opt to leave it out.
Thursday 23 January 2014
mexican coffee buns
And we're back! What was supposed to be a short break from the kitchen to prepare for my wedding ended up getting extended by another 3 months thanks to an unexpected (but not unwelcome!) pregnancy. If you ask me, it should be called all-day sickness rather than morning sickness. I must have memorised my toilet bowl's every contour in those few weeks. The only thing that got me through was knowing that my suffering meant my baby's continued survival.
Well, thankfully, I've since reached the 2nd trimester and while I'm horrified to see my weighing scale flash numbers I've never seen before in all my life, I'm glad that the nausea has mostly abated and that I'm back to loving food again--particularly the sweet kind, to the dismay of my elf who jokingly predicted that our child is going to be born with dental caries. (As if it dares.) And so, in honour of my bun in the oven, I hauled out my dusty kitchenaid and activated my oven (the real one) to make these coffee buns.


We locals know them as Rotiboy/PappaRoti/MammaRoti, whichever is still in business currently. (I should probably call mine RotiGirl. hurhurhur.) I distinctly remember the first time I had one of these back in 2005. It was love at first bite, which is surprising for a non-coffee-lover. The recipe I used churned out buns that are more cinnamon-y than coffee-ish which I actually prefer. This is again surprising because I usually hate cinnamon. My little kicker apparently doesn't share my taste preferences.

Mexican Coffee Buns (makes 10 buns)
(adapted from Kitchen Corner)
Ingredients
(for the dough)
250g bread flour
38g caster sugar
3g salt
4g instant yeast
1/2 beaten egg
135g fresh milk
30g unsalted butter, softened
(for the filling)
140g salted butter, cold (cut into 10 cubes, each weighing 14g)
(for the topping)
50g unsalted butter, softened
40g icing sugar
38g beaten egg (slightly less than 1 egg)
1 tsp granulated coffee dissolved in 1 tsp of water (I used decaffeinated coffee)
1/4 tsp cinnamon powder
50g plain flour
Directions
- (for the topping)
- Beat the butter and the icing sugar until fluffy.
- Gradually add in the beaten egg, and then the coffee, mixing well in between.
- Add in the flour and cinnamon powder and mix until well combined.
- Place mixture in a small piping bag and refrigerate.
- (for the dough)
- In a mixing bowl fitted with a dough hook attachment, add the bread flour, sugar, salt, yeast, egg and milk and knead on slow speed.
- When ingredients are well-incorporated, add in the butter and continue mixing for about 30min until dough is smooth and elastic and not sticky.
- Divide the dough into 10 portions (by weight) and let it rest on a baking tray for 15min.
- Roll out each dough portion into a flat disc, place a cube of salted butter (the filling) in the centre. Seal it up tightly. (Make sure the edges of the dough are properly sealed otherwise the filling will ooze out, as some of mine did.)
- Place the filled dough balls back onto the baking tray, shaping them to be as round as possible, and spacing them at least 2-3inches apart Lightly cover with clingwrap and allow to rise for about 50-60min.
- Remove piping bag filled with topping from refrigerator. Snip off the end of the piping bag and pipe out the topping in a spiral pattern onto the dough. (As in the picture above.)
- Preheat oven to 200°C in the meantime.
- Bake buns for about 12-15min.
Tuesday 9 July 2013
spinach and parmesan loaf
Wow it's been ages since I last logged onto blogger. Life's been a blur of late. So busy worrying about everything! Wedding preps, finding jobs, whether my teeth have moved too quickly and are now rootless... Well, one piece of good news is that I have finally paid off my bond and am now a free (wo)man! Which means I now have the power to decide my working hours! Which means that I have more time to bake! YEAH.
The downside is that the less you work, the less dough you roll in. Oh well. You can't have everything in life and right now I have decided I could do with a break. And some bread, since we're on the subject of dough.

This bread brings back fond memories of the time my elf and I first started dating. We were celebrating my birthday for the first time as a couple and the restaurant we went to served the most delicious spinach parmesan bread. I remember thinking I would love to try my hand at making some one day and so here I am, 8 years later, doing just that.

Started off by blending up some cooked spinach. I bought this stick blender/food processor for my sister as my dear niece has recently started taking tentative steps into the world of REAL FOOD (though in the pureed form, for now). I have a monster food processor which my elf gave me for Christmas but I was too lazy to bring it down from my room so I borrowed hers. I can't help marveling at a food processor in action the way most men marvel over the workings of a sports car (or a dyson vacuum cleaner). Is that sad?

Speaking of sad, I actually had to make this twice as the yeast I used in the first batch was inexplicably dead. Which is strange considering it was an unopened, unexpired packet that I had made sure to store in a cool, dry place. Ah, yeast. I have a love-hate relationship with the stuff.

looking less green in the glow of the golden hour
My version turned out slightly tougher and chewier than the original (at least from what I remember) but my elf really liked it. He says that's how real bread should be. (What?! Japanese soft fluffy milk bread rox4eva, hello?) That being said, it smelled heavenly and the flavour was great too. Pile on a slab of salted butter on a warm slice and I'm sold, tough and chewy or not.
Spinach Parmesan Loaf
Ingredients
100g spinach leaves (I used chinese spinach)
1 small onion, diced
2 tbsps vegetable oil
1/2 cup water
1/2 cup milk
1 egg
4 cups bread flour
1 tsp sugar
2 tsp salt
7g active dry yeast
150g grated parmesan cheese
1 tbsp of butter, melted
Directions
- Heat vegetable oil in a pan, add in the diced onion and sauté until golden brown.
- Add the spinach leaves and cook until tender.
- Place in a food processor and pulse until finely chopped (as in picture above).
- Leave to cool.
- In a mixing bowl fitted with dough hook attachment, add cooled chopped spinach, water, milk and egg.
- Add in bread flour.
- Create a small well in bread flour, add in yeast and bury it with the surrounding flour.
- Add sugar, salt and cheese.
- Knead on speed 2 for about 10-15min until dough is elastic and no longer sticky.
- Leave to proof in a bowl covered with a damp towel for about 2h or until doubled in volume
- Punch down dough on a floured working surface and shape into a sandwich loaf (or mini rolls if you prefer) and place in bread pan.
- Leave to rise until doubled in volume
- Preheat oven to 200°C.
- Brush the top of risen dough with melted butter
- Bake bread for about 20min or until crust turns golden brown and the loaf has a hollow sound when you tap it with a knife.
Thursday 30 May 2013
salted caramel swiss roll
My taste buds have evolved quite a bit through the years but some things have withstood the test of time. Like my love for swiss rolls. All kinds really. Old school bakery type with the greasy buttercream, cheapo-but-still-decent Polar rolls, light-as-air but pricey Japanese ones... Give me a roll and I'll be swallowing it so fast my oesophagus will start to cramp--does that happen to you too?
My absolute favourite, though, has to be the ones from Rich & Good Cake Shop. I fondly recall the times we'd rush down from clinics in order to snag one (who am I kidding? 2, at the very least) of the limited rolls on sale at the hospital bazaar. It has always been my wish to recreate their swiss rolls but it just seemed like too daunting a feat.
Then I found Su-lyn's recipe.

I am my own worst critic and I usually don't think of the stuff I make as fantastic. But I have to say I was very pleased with this. It wasn't perfect (I tore a bit of the skin off while unrolling the cake and it's more oval than round) but it tasted almost as good as R&G's. Definitely way better than the old school bakery's and Polar's, at any rate. And the best part? It refrigerated really well! Usually cakes tend to dry out and harden when refrigerated but this was still light and fluffy after a night in the fridge.

Looks like a fleece blanket and has the texture of one too.
I filled mine with whipped cream and salted caramel because I am predictable like that. Had a panicky moment when I OD-ed on the (slightly under-whipped) whipped cream and the filling came oozing out like the blob from my childhood nightmares as I rolled up the cake. Explains the rather loose and flat roll. Well, our tummies were pleased even if my eyes weren't.

Strictly-speaking, the skin should be on the internal surface according to the recipe but I quite liked the golden-brown colour so I took the liberty of inverting it. Err... plus I made a crater when peeling off the foil but let's not talk about that. Either way, it's gonna end up in your stomach faster than your oesophagus can handle so have a cup of tea (preferably not scalding hot) at the ready.
Salted Caramel Swiss Roll
Roll Cake
This is the link to Su-lyn's roll cake recipe. Her instructions are so clear and concise I decided I can't make it any more comprehensive.
For the filling:
Salted Caramel
Ingredients
125g caster sugar
12.5ml water
75ml whipping cream
75g butter
Sea salt (to taste)
Instructions
- Put sugar and water in saucepan and heat gently, stirring until sugar dissolves.
- Raise the heat and, without stirring, wait until sugar caramelises and turns amber (watch closely and prepare to remove from heat once it turns golden as it burns quickly).
- Remove from heat and slowly pour in whipping cream, whisking well as you add the cream. (Be careful when adding the cream as it spits and hot caramel burns like hell.)
- Stir in the butter.
- Add sea salt as desired.
- Leave to cool.
Whipped cream
Ingredients
200ml whipping cream
Instructions
- Pour cream into a mixing bowl and using a whisk attachment, whisk until soft peaks form.
Friday 22 March 2013
banana cupcakes with bailey's buttercream
One time my uncle decided to add a splash of Bailey's Irish Cream to the milkshake and it was so good I've come to associate Bailey's with bananas. Hence this recipe.


Banana Cupcakes with Bailey's Buttercream Frosting (makes ~12 cupcakes)
Banana Cupcakes
Ingredients
160g plain flour
110g caster sugar
2 tsp baking powder
½ tsp baking soda
¼ tsp salt
125g unsalted butter
3 eggs
½ tsp vanilla extract
3 small bananas or 2 large ones (the riper the better)
Directions
- Mash the bananas in a bowl and set aside.
- Preheat the oven to 175°C.
- Cream the butter and sugar until pale and fluffy.
- Add in the vanilla extract and mix well.
- Add in the flour, baking powder, baking soda, salt and eggs and mix until well-combined.
- Add in the mashed bananas and continue mixing.
- Fill cupcake liners with mixture until ~¾ full
- Bake for 15-20min until you can smell the cupcake aroma from the oven, the tops have turned golden brown, and toothpick inserted in centre comes out clean.
Bailey's Buttercream Frosting
Ingredients
2 egg whites
60g caster sugar
84g unsalted butter, softened
30-40ml Bailey's Irish Cream (or to your liking)
Directions
- Pour egg whites and sugar into a clean, heatproof bowl and heat over a saucepan of simmering water, whisking the egg and sugar constantly so it does not curdle.
- Continue whisking until mixture reaches 70°C.
- Remove from heat and transfer to a mixing bowl with whisk attachment
- Whisk until soft (not stiff yet), glossy peaks form and mixture has cooled to room temperature.
- Add in the Baileys a little bit at time, whisking well between additions.
- Change to paddle attachment, add in the butter and beat until it reaches frosting consistency. (Refer to this post for greater detail)
- Taste the buttercream--you can still add in more Bailey's if you wish.
- Frost as desired.
Additional:
I decorated my cupcakes by sprinkling some Banana Nut Crunch cereal (finely crushed), and topped it with a banana slice coated in honey.
Subscribe to:
Posts (Atom)