Showing posts with label bread. Show all posts
Showing posts with label bread. Show all posts
Thursday, 23 January 2014
mexican coffee buns
And we're back! What was supposed to be a short break from the kitchen to prepare for my wedding ended up getting extended by another 3 months thanks to an unexpected (but not unwelcome!) pregnancy. If you ask me, it should be called all-day sickness rather than morning sickness. I must have memorised my toilet bowl's every contour in those few weeks. The only thing that got me through was knowing that my suffering meant my baby's continued survival.
Well, thankfully, I've since reached the 2nd trimester and while I'm horrified to see my weighing scale flash numbers I've never seen before in all my life, I'm glad that the nausea has mostly abated and that I'm back to loving food again--particularly the sweet kind, to the dismay of my elf who jokingly predicted that our child is going to be born with dental caries. (As if it dares.) And so, in honour of my bun in the oven, I hauled out my dusty kitchenaid and activated my oven (the real one) to make these coffee buns.


We locals know them as Rotiboy/PappaRoti/MammaRoti, whichever is still in business currently. (I should probably call mine RotiGirl. hurhurhur.) I distinctly remember the first time I had one of these back in 2005. It was love at first bite, which is surprising for a non-coffee-lover. The recipe I used churned out buns that are more cinnamon-y than coffee-ish which I actually prefer. This is again surprising because I usually hate cinnamon. My little kicker apparently doesn't share my taste preferences.

Mexican Coffee Buns (makes 10 buns)
(adapted from Kitchen Corner)
Ingredients
(for the dough)
250g bread flour
38g caster sugar
3g salt
4g instant yeast
1/2 beaten egg
135g fresh milk
30g unsalted butter, softened
(for the filling)
140g salted butter, cold (cut into 10 cubes, each weighing 14g)
(for the topping)
50g unsalted butter, softened
40g icing sugar
38g beaten egg (slightly less than 1 egg)
1 tsp granulated coffee dissolved in 1 tsp of water (I used decaffeinated coffee)
1/4 tsp cinnamon powder
50g plain flour
Directions
- (for the topping)
- Beat the butter and the icing sugar until fluffy.
- Gradually add in the beaten egg, and then the coffee, mixing well in between.
- Add in the flour and cinnamon powder and mix until well combined.
- Place mixture in a small piping bag and refrigerate.
- (for the dough)
- In a mixing bowl fitted with a dough hook attachment, add the bread flour, sugar, salt, yeast, egg and milk and knead on slow speed.
- When ingredients are well-incorporated, add in the butter and continue mixing for about 30min until dough is smooth and elastic and not sticky.
- Divide the dough into 10 portions (by weight) and let it rest on a baking tray for 15min.
- Roll out each dough portion into a flat disc, place a cube of salted butter (the filling) in the centre. Seal it up tightly. (Make sure the edges of the dough are properly sealed otherwise the filling will ooze out, as some of mine did.)
- Place the filled dough balls back onto the baking tray, shaping them to be as round as possible, and spacing them at least 2-3inches apart Lightly cover with clingwrap and allow to rise for about 50-60min.
- Remove piping bag filled with topping from refrigerator. Snip off the end of the piping bag and pipe out the topping in a spiral pattern onto the dough. (As in the picture above.)
- Preheat oven to 200°C in the meantime.
- Bake buns for about 12-15min.

Tuesday, 9 July 2013
spinach and parmesan loaf
Wow it's been ages since I last logged onto blogger. Life's been a blur of late. So busy worrying about everything! Wedding preps, finding jobs, whether my teeth have moved too quickly and are now rootless... Well, one piece of good news is that I have finally paid off my bond and am now a free (wo)man! Which means I now have the power to decide my working hours! Which means that I have more time to bake! YEAH.
The downside is that the less you work, the less dough you roll in. Oh well. You can't have everything in life and right now I have decided I could do with a break. And some bread, since we're on the subject of dough.

This bread brings back fond memories of the time my elf and I first started dating. We were celebrating my birthday for the first time as a couple and the restaurant we went to served the most delicious spinach parmesan bread. I remember thinking I would love to try my hand at making some one day and so here I am, 8 years later, doing just that.

Started off by blending up some cooked spinach. I bought this stick blender/food processor for my sister as my dear niece has recently started taking tentative steps into the world of REAL FOOD (though in the pureed form, for now). I have a monster food processor which my elf gave me for Christmas but I was too lazy to bring it down from my room so I borrowed hers. I can't help marveling at a food processor in action the way most men marvel over the workings of a sports car (or a dyson vacuum cleaner). Is that sad?

Speaking of sad, I actually had to make this twice as the yeast I used in the first batch was inexplicably dead. Which is strange considering it was an unopened, unexpired packet that I had made sure to store in a cool, dry place. Ah, yeast. I have a love-hate relationship with the stuff.

looking less green in the glow of the golden hour
My version turned out slightly tougher and chewier than the original (at least from what I remember) but my elf really liked it. He says that's how real bread should be. (What?! Japanese soft fluffy milk bread rox4eva, hello?) That being said, it smelled heavenly and the flavour was great too. Pile on a slab of salted butter on a warm slice and I'm sold, tough and chewy or not.
Spinach Parmesan Loaf
Ingredients
100g spinach leaves (I used chinese spinach)
1 small onion, diced
2 tbsps vegetable oil
1/2 cup water
1/2 cup milk
1 egg
4 cups bread flour
1 tsp sugar
2 tsp salt
7g active dry yeast
150g grated parmesan cheese
1 tbsp of butter, melted
Directions
- Heat vegetable oil in a pan, add in the diced onion and sauté until golden brown.
- Add the spinach leaves and cook until tender.
- Place in a food processor and pulse until finely chopped (as in picture above).
- Leave to cool.
- In a mixing bowl fitted with dough hook attachment, add cooled chopped spinach, water, milk and egg.
- Add in bread flour.
- Create a small well in bread flour, add in yeast and bury it with the surrounding flour.
- Add sugar, salt and cheese.
- Knead on speed 2 for about 10-15min until dough is elastic and no longer sticky.
- Leave to proof in a bowl covered with a damp towel for about 2h or until doubled in volume
- Punch down dough on a floured working surface and shape into a sandwich loaf (or mini rolls if you prefer) and place in bread pan.
- Leave to rise until doubled in volume
- Preheat oven to 200°C.
- Brush the top of risen dough with melted butter
- Bake bread for about 20min or until crust turns golden brown and the loaf has a hollow sound when you tap it with a knife.
Thursday, 10 January 2013
spicy red pepper bread
Sometime during the festive week we finally went on a picnic. I say finally because we had actually been intending to go on one approximately 9 months ago and had been constantly postponing it because, well, the weather here just makes staying indoors a much better option. But the temperature cooled considerably with the December rain so we filled up the lovely picnic basket he bought 9 months ago, and went in search of a nice patch of grass to set up camp.
I don't know about you, but at every picnic I've been to, we usually end up with a huge amount of leftover food. Thankfully, this time round our calculations weren't too far off and we only ended up leaving with an unopened bag of chips and a small tub of spicy red pepper dip. We bought the dip from the supermarket and it tasted pretty good so I was quite reluctant to see that go to waste. The elf mentioned that it would taste superb on bread and I thought, "why not put it in bread?"

So that's what I did! Naturally, I used the Japanese milk bread tangzhong method again, having been so impressed with the results. To be honest, I don't think I can go back to making bread any other way. Perhaps one day when my palate and masticatory muscles have developed well enough for me to start appreciating the tough, chewy, funky-looking kind of bread so highly favoured by my parents.

The thing about using pastes which you don't make yourself is that you have no idea what went in it. I got a bit nervous when my dough turn a lurid orange hue and even more so when it did not seem capable of rising. I was fervently hoping it was due to the lower ambient temperature brought about by the torrential downpour that started just as I was about to proof the dough, and not some secret antifungal in the dip that killed my yeast. Come to think of it, the same thing happened the last time I made my olive herb loaf. I assume it must be the rain because that's the only common variable? So after the skies cleared I quickly brought my dough out to sunbathe and it eventually rose. Lesson learnt: avoid baking bread during the monsoon season.

The bread is sufficiently tasty on its own but I prefer to eat it warm--either fresh from the oven or toasted--and with a generous chunk of salted butter.
Spicy Red Pepper Bread (makes two 21cm x 11cm x 5.5cm loaves)
Ingredients
295g bread flour
40g caster sugar
4g salt
5g full cream milk powder
6g instant dried yeast
1 tsp garlic powder
1 egg beaten (and 1 more egg, for eggwash)
30g whipping cream
27g milk
92g tangzhong (instructions here)
25g melted salted butter (cooled to room temperature)
100g spicy red pepper dip (I bought mine from Cold Storage's deli section)
Directions
The bread is sufficiently tasty on its own but I prefer to eat it warm--either fresh from the oven or toasted--and with a generous chunk of salted butter.
Spicy Red Pepper Bread (makes two 21cm x 11cm x 5.5cm loaves)
Ingredients
295g bread flour
40g caster sugar
4g salt
5g full cream milk powder
6g instant dried yeast
1 tsp garlic powder
1 egg beaten (and 1 more egg, for eggwash)
30g whipping cream
27g milk
92g tangzhong (instructions here)
25g melted salted butter (cooled to room temperature)
100g spicy red pepper dip (I bought mine from Cold Storage's deli section)
Directions
- Add bread flour, sugar, salt, milk powder, yeast and garlic powder into mixing bowl.
- Pour in the egg, whipping cream, milk and tangzhong.
- Knead using a dough hook attachment on speed 2.
- When ingredients start to come together, add the melted butter.
- Add in the spicy red pepper dip and continue kneading for ~20min until dough is smooth and elastic. (You can add more flour if the dough appears too wet. This varies according to the consistency of the dip you use.)
- Place a damp towel over the mixing bowl and leave to proof in a warm place until dough doubles in volume (mine took about 1h).
- Transfer dough to a clean, floured surface and punch it down.
- Divide dough into portions weighing ~70g.
- Shape it as instructed here.
- Leave to proof again.
- Preheat oven to 180˚C.
- Brush tops of risen dough with eggwash.
- Bake for ~20min or until golden brown.
Tuesday, 16 October 2012
olive herb bread
I haven't really had time to do my weekly baking lately, what with Saturday duties and wedding preparations getting in the way, so Profiterole Part II is still work in progress! Thankfully I've got a few unblogged recipes to fill the gap in the meantime.
First up is a bread recipe! Have I mentioned how much I prefer baking bread to anything else? It's so much quicker and cleaner! As opposed to desserts where you have to wash your mixing bowl multiple times (depending on how many components you have), not to mention the frosting paraphernalia like nozzles and couplers which are such a pain to clean (thank goodness for interdental brushes!) And everything is just so greasy that I find myself constantly depleting the detergent supply. Bread, on the other hand, is a single component so you only have to use the mixing bowl once (or not at all if you knead by hand) and the flour soaks up all the butter/oil so it's much less greasy.
Anyway, having been so thoroughly satisfied with the Japanese Milk Bread using the tangzhong method, I decided to use it as a base for my herb bread. I was a bit worried initially because my dough didn't seem to want to rise. Had to wait much longer before expansion became evident. Perhaps it was because I did this on a cold, rainy day and my little yeast friends were feeling a bit lethargic? Whatever the case, they eventually rose to the occasion (hurhurhur) and a beautiful tasty loaf was born.
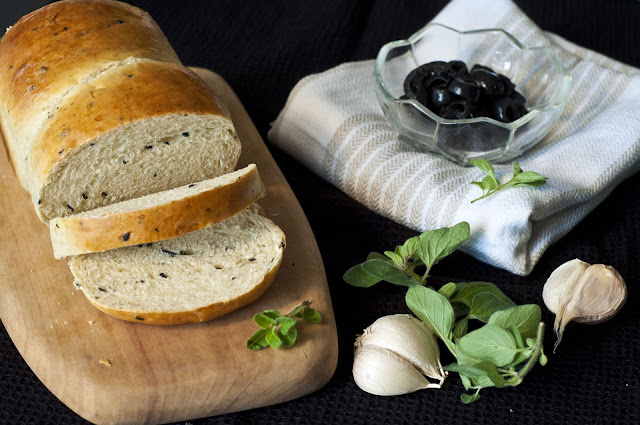
Creamy scrambled eggs piled on top of slice of this makes for a perfect weekend breakfast, in my opinion. Or you could eat it plain, which was how we phagocytosed half the loaf after it came out of the oven.

Olive Herb Bread
(base Hokkaido Milk Loaf recipe obtained from Christine's Recipe)
Ingredients
270g + 25g bread flour
43g caster sugar
4g salt
4.5g full cream milk powder
5.5g instant dried yeast
125ml water
1 egg, beaten (and 1 more egg for the eggwash)
30g whipping cream
27g milk
25g salted butter, melted and cooled to room
temperature
¼ cup chopped black olives
1 tsp dried oregano
1 ½ tsp garlic powder
Directions
- In a saucepan dissolve 25g bread flour in 125ml water
- Cook in medium-low heat, stirring constantly with whisk, until mixture starts to thicken and forms streaks when stirred.
- Pour thickened mixture (or tangzhong) into bowl
- Place clingwrap film over tangzhong (film should be sticking to tangzhong to prevent surface from drying up) and leave to cool to room temperature
- In a mixing bowl add 270g bread flour, sugar, salt, milk powder, oregano, garlic powder and yeast
- Add in egg, whipped cream, milk and 92g of tangzhong
- Mix using dough hook attachment on speed 2
- When ingredients start to come together, add melted butter and chopped black olives (picture 1)
- Continue to mix until dough is smooth and elastic (about 20min)
- Leave to proof for about 40min or until dough doubles in volume (picture 3)
- Transfer dough to a clean, floured surface and punch it down
- Divide dough into portions weighing about 70g
- Roll it out into a flattened circle and fold (as in picture 4)
- With seal upwards, roll into a cylinder (as in picture 5)
- Place in a bread pan and leave to rise (picture 6)
- Preheat oven to 180 deg Celsius
- Brush tops of risen dough with eggwash
- Bake for 30min or until golden brown
Tuesday, 4 September 2012
japanese milk bread sausage rolls
I never really knew what those soft bread buns sold in local bread shops were called. You know, the soft, fluffy, slightly sweet bread that can be found wrapped around a hotdog or topped with pork floss? I am an ardent fan of that particular kind of bread and was yearning to learn how to make it but it's quite difficult to find the recipe for something when you don't know what it's called. Thanks to the most amazing search engine that is Google, not only did I come to know of its name, I was also directed to a website that taught me how to successfully make it! (And to think all I did was type in "soft fluffy bread." Google is GREAT!)

Apparently it's referred to as a Hokkaido milk loaf or japanese milk bread and the secret to achieving such fluffiness is credited to a (not-so-)secret ingredient called tangzhong or water roux starter. Tangzhong is made by heating a mixture of flour and water to 65 deg Celsius to form a paste. It is said that this will cause the gluten in the mixture to "absorb the moisture and become leavened." The explanation seems rather sketchy to me. I shall endeavour to do more research on this.

(Apologies, the prettier rolls got eaten up before I could photograph them)

The recipes below are adapted from Yvonne Chen's book 65°C湯種麵包 as mentioned on Christine's Recipes
Tangzhong
Ingredients
50g bread flour
250ml water
Directions
- In a saucepan, stir the flour and water together with a wooden spoon or whisk until no longer lumpy
- Cook mixture over medium-low heat, stirring continuously until it starts to thicken and streaks appear when stirring.
- Remove from heat and place clingwrap film over mixture such that the film is adherent to the surface
- Leave to cool to room temperature

Japanese Milk Bread (as in Sausage Rolls)
Ingredients
540g bread flour
86g caster sugar
8g salt
9g full cream milk powder
11g instant dry yeast
2 eggs (or 86g of egg), whisked
59g whipping cream
54g milk
184g tangzhong
49g unsalted butter, melted
1 more whisked egg for surface coating
~12 chicken franks or your preferred sausages
Directions
- Add flour, sugar, salt, milk powder and yeast into a mixing bowl
- Add in eggs, whipping cream, milk and tangzhong
- Using a dough hook attachment, mix until ingredients are just combined
- Pour in melted butter
- Continue to knead for ~30min until dough is elastic and smooth and no longer sticky
- Leave to rise under a damp towel until doubled in size (in my hot, humid country, this takes about 20min)
- Transfer dough to a clean floured surface and punch down
- Preheat oven to 180 deg Celsius
- Divide dough into portions weighing about 60g
- Roll out each portion into a thin tube (make the ends thinner than the body) and wrap around sausage
- Place on greased baking pan (ends of dough tube on the bottom), cover with clingwrap and leave to rise for another 20min
- Brush tops with eggwash and bake for 30min or until golden brown
Subscribe to:
Posts (Atom)