Showing posts with label pastry. Show all posts
Showing posts with label pastry. Show all posts
Monday, 10 December 2012
berry tart
When I visited the UK a few months back, I was delighted to find strawberries and blueberries going for about £1 a punnet. It was my first purchase upon touching down on English soil and they tasted absolutely amazing after starving for 14h on the plane. Sadly, the berries we get here in Singapore are not only hideously expensive but are often horribly sour/tasteless. I try to avoid buying them unless they're on sale at the supermarket.

I was planning to make a mixed berry tart with strawberries, blueberries, blackberries and raspberries but the eye-popping price tags on the berries made me decide on a 2-berry tart instead. Might have gone with a plain blueberry (my favourite berry!) tart if weren't for the irresistible lure of the strawberries' vibrant hue. Just seeing all the bright colours in this post makes me so happy.

The blueberries were surprisingly sweet and the strawberries weren't too bad either. Sadly, I think I'd overworked my pastry this time round so it was a bit tough intially. But a night in the fridge helped it to soak up a bit of moisture from the crème pâtissière and it was just right when we ate it the next day. As you can see from the photos, I went a bit overboard with the crème pâtissière on the larger tart but it was soooo good I couldn't resist flooding the tart with it. Can you tell it's my favourite thing at the moment?

I got the recipe for the pâte sucrée from Michel Roux's Pastry: Savoury of Sweet. I strongly encourage you to get the book if you haven't already done so. It's well worth the money! (Not that you have to fork out all that much for it anyway.)
For the filling I used a mixture of whipped cream and crème pâtissière. I did some guesstimation when it came to proportions so I can't give you the exact measurements but it's approximately a 1:1 ratio in weight.
Sorry for the sketchy recipe this time round! That's the problem with leaving it too late to blog a recipe (and failing to record it down in the first place)--you forget everything! I'll be sure to update this post the next time the berries go on sale at the supermarket.

Saturday, 24 November 2012
profiterole part 2: filling up on crème pâtissière
Finally got down to making some crème pâtissière last weekend so we are good to go with this post!
Ok, so you've got the perfect choux buns, but what's the point if you haven't got some luscious filling to stuff it with? There are many options when it comes to stuffing a profiterole. You can use run-of-the-mill whipped cream, ice cream, chantilly cream, or crème pâtissière (aka pastry cream). You can even opt to branch out into flavours aside from the traditional vanilla. The last time I made choux pastry, we had an appalling amount of durians waiting to be used so I made a batch of durian puffs. My elf says we no longer need to buy them from Goodwood Park Hotel. (But that's for another post, perhaps when the durians come flooding in again.)
I find a combination of chantilly cream and crème pâtissière works best for my profiteroles. Crème pâtissière can be a little bit heavy so combining the two results in a more desirable consistency. The resulting mixture was so good we piled it on top a bunch of strawberries and polished off the punnet. (Better than the strawberries & cream at Wimbledon, in my opinion.)
There are various methods to filling a profiterole, depending on the type of filling you choose. If you're going with a stiffer filling like ice cream, you can section the choux bun transverely (like a hamburger bun), pipe or scoop the filling onto the bottom half, and then top it with the choux lid. If your filling is of a thinner consistency, you can use my method which is to pour the cream into a squeeze bottle, poke a hole in the bottom of the choux bun and slowly squeeze the filling in. Be careful, though. The pastry is rather delicate so using too much force or overfilling can result in unwanted extrusion at the other end. (Like a badly done root canal. Sorry I couldn't resist.)

Crème pâtissière -- makes ~370g
Ingredients
3 egg yolks
60g caster sugar
20g plain flour
250ml milk
1 vanilla pod, split longitudinally
Directions
- Whisk egg yolks and ⅓ of the sugar together in a bowl to a light ribbon consistency
- Whisk in the flour
- Pour the milk into a saucepan and add the vanilla pod (and the seeds scraped out from the pod)
- Heat the vanilla-milk until it comes to a boil, then pour the milk into the egg yolk mixture, stirring as you go.
- Transfer the mixture back into the saucepan and bring it to a boil over a medium heat, stirring continuously with a whisk until mixture starts to thicken.
- Pour into a bowl and place a clingwrap film on the surface of the mixture to prevent a skin from forming
- Leave to cool to room temperature then chill in the fridge for ~1h
Chantilly Cream -- makes ~250g
Ingredients
200ml whipping cream, chilled
10g icing sugar
pinch of vanilla powder or ½ tsp vanilla extract
Directions
- Pour the chilled whipping cream, icing sugar and vanilla into a mixing bowl fitted with a whisk attachment and whisk until soft peaks form.
**Assembly
- Gently fold the crème pâtissière into the chantilly cream with a spatula until combined.
- Fill a squeeze bottle (or piping bag with small round nozzle) with the cream mixture
- Poke a hole in the base of the choux puff with a toothpick/skewer
- Fill puff with desired amount of cream
- Coat the top of the choux puffs with ganache (optional)
Wednesday, 3 October 2012
profiterole part I: conquering the pâte à choux
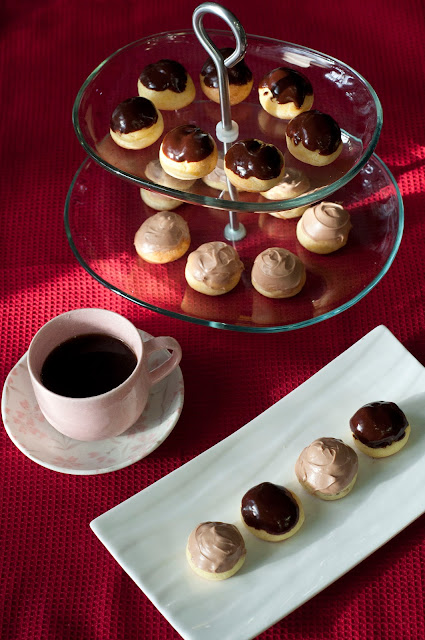
I had tried making choux pastry before and while it wasn't a complete disaster, it wasn't fantastic like I'd hoped. The puffs would come out of the oven golden brown and well, puffed-up, so to speak, and I'd be all happy. But a short while later, they--and therefore, I--would start to deflate.
In hopes of improving my culinary skills, I have been reading more pastry books to better my knowledge on the subject. An important lesson I learnt in university is that you need to know what you are doing in order to do it properly. (Otherwise you should get out of the clinic kitchen.) The problem with recipes from such books is that, more often than not, you get products that do not turn out as well as they appear in the drool-worthy accompanying photographs. Thankfully, this was not the case in Michel Roux's Pastry. I've always maintained that the French are the best when it comes to pastries and he's proven me right with his recipes. I tested out his choux paste recipe and it worked beautifully! The puffs inflated impressively and held their shape, and the texture was amazingly light and fluffy. It was so good you could happily eat it sans filling.

But of course, they taste even better stuffed with crème pâtissière and coated with chocolate so that's what I did.


I highly recommend getting his book. It's got all sorts of pastry recipes and, more importantly, pictures to guide you every step of the way. I can't wait to test out the croissant and brioche recipes! My goal for this year is to successfully make a croissant but it's really labour-intensive and time-consuming so I'll have to wait till I'm on leave to attempt it. For now, I'll leave you with the choux recipe.
 Pâte à choux -- makes 40-50 choux buns
(adapted from Michel Roux's Pastry: Savoury & Sweet)
Ingredients
125ml milk
125ml water
100g unsalted butter, diced
½ tsp salt
1 tsp caster sugar
150g plain flour
4 eggs
eggwash (1 egg yolk mixed with 1 tbsp milk)
Directions
Once cooled you can then proceed to fill them up with chantilly cream or crème pâtissière. I used the latter for my profiteroles and will share the recipe once I've taken better photos. So stay tuned for profiterole part II: filling up on crème pâtissière
But of course, they taste even better stuffed with crème pâtissière and coated with chocolate so that's what I did.
I highly recommend getting his book. It's got all sorts of pastry recipes and, more importantly, pictures to guide you every step of the way. I can't wait to test out the croissant and brioche recipes! My goal for this year is to successfully make a croissant but it's really labour-intensive and time-consuming so I'll have to wait till I'm on leave to attempt it. For now, I'll leave you with the choux recipe.
(adapted from Michel Roux's Pastry: Savoury & Sweet)
Ingredients
125ml milk
125ml water
100g unsalted butter, diced
½ tsp salt
1 tsp caster sugar
150g plain flour
4 eggs
eggwash (1 egg yolk mixed with 1 tbsp milk)
Directions
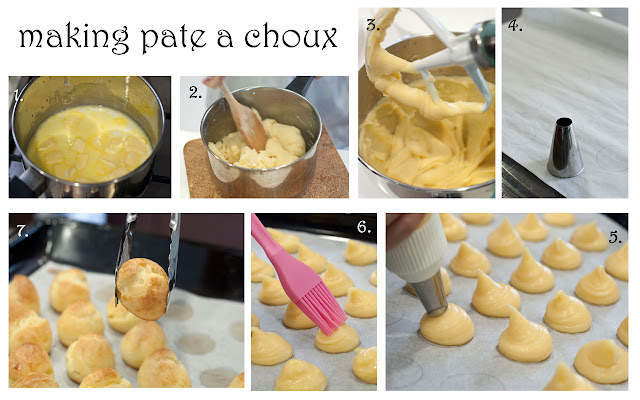
- Combine milk, water, sugar, salt and butter in a saucepan and set over low heat (picture 1)
- Bring to a boil and remove saucepan from heat
- Add in flour and mix with a wooden spoon until smooth (picture 2)
- Return pan to medium heat and stir continuously for 1min to dry out the paste
- Transfer to a mixing bowl and fit on a paddle attachment
- Add eggs, one at a time, beating well between each addition, until you get a smooth paste (picture 3)
- (optional step) Using a pencil, draw staggered rows of circles (~2cm in diameter) on a baking paper, leaving about 1.5cm space between circles. (I used a nozzle for this as shown in picture 4.) Turn paper facedown on baking tray. The pencil markings should still be visible.
- Preheat oven to 180 deg Celsius
- Pour paste into a piping bag fitted with a 1cm plain nozzle and pipe small mounds of paste the size of the drawn circles (picture 5)
- Brush choux with eggwash, flattening the pointed ends with the pastry brush (picture 6)
- Bake in oven for ~20min or until tops are golden brown (picture 7)
- Use a spatula or tongs to separate the choux buns from the baking paper immediately after removing from the oven. The excess eggwash will cause them to stick
- Place on a wire rack and leave to cool
Once cooled you can then proceed to fill them up with chantilly cream or crème pâtissière. I used the latter for my profiteroles and will share the recipe once I've taken better photos. So stay tuned for profiterole part II: filling up on crème pâtissière
Tuesday, 11 September 2012
salted caramel mousse tart
There are certain combinations in life that are an absolute match made in heaven. In my opinion, none more so than salty-sweet combos. Peanut butter & chocolate, ice cream with fries (you either hate it or love it and I looove it!) and of course, the ever popular salted caramel or sea salt caramel. I have a lukewarm reaction towards caramel but add a dash of sea salt to it and I could probably finish an entire jarful of the stuff--which is not too smart, given my profession.
After reading up a little on pastry, I felt inspired to make some kind of tart and was trying to decide between banoffee or salted caramel for the filling. Opted for a salted caramel mousse in the end.

I had attempted to make my own crust with this same recipe previously and it turned out quite all right but for some reason, the second attempt turned out to be an utter disaster! I had such a difficult time transferring the rolled-out dough to the tart pan! It drove me nuts and I ended up injuring my hand. Thankfully, my trusty elf was around to calm me down and suggest I try again in the morning after a good night's rest.
So the next morning, I got up bright and early and tried again. You know how they always say you need a cool environment and really cold butter to make good pastry? Well I've learnt that it definitely helps to have a cool head as well, cuz tadah!

Lovingly and calmly made, with an injured dominant hand, I might add. Yes, never underestimate the power of a good night's rest (and an air-conditioned room.)


This being my first time using gelatin and making a mousse, I miscalculated the amount of gelatin required and the mousse turned out a little too runny. Perhaps it was a subconscious thing since I find the idea of using beef collagen in my dessert rather disturbing. I've amended the measurement in the recipe below.
Sweet Shortcrust Pastry
(recipe adapted from Jamie Oliver)
Ingredients
250g plain flour
25g icing sugar
125g salted butter, cold and grated
Zest of half a large lemon
1 egg, beaten
Splash of milk
Directions
- Mix flour, sugar and grated butter to produce crumbs
- Mix in lemon zest
- Add eggs and milk into mixture and gently work it together until you have a ball of dough. (Don't overwork the dough. Use cold hands.)
- Cover with clingwrap film and put in fridge to rest for at least 1h
- Take dough out and roll onto baking paper until ~3-5mm thick and large enough to cover 8-inch tart pan (I use the kind with a removable base)
- Transfer to tart pan (you can either wrap dough around your rolling pin and roll out over the pan, or just flip the baking paper with dough rolled out on it over the pan and peel the dough off, which is what I did) and gently adapt the dough to the pan as in the picture above. Remove any excess
- Poke holes in crust with a fork
- Cover with clingwrap and place in freezer for about 1h.
- Preheat oven to 180 deg Celsius
- Remove crust from freezer and bake blind (place aluminium foil over crust and fill with pastry weights or pulses) for 12min or until golden brown
- Remove from oven and leave to cool
Salted Caramel Mousse
Ingredients
125g caster sugar
12.5ml water
75ml + 1 cup thickened cream
75mg salted butter
Sea salt flakes
2 tbsps water
1.5 tbsps powdered gelatin
Directions
- Pour 2 tbsps of water into a ramekin, sprinkle with powdered gelatin and set aside
- Put sugar and 12.5ml water into a saucepan and heat gently, stirring until sugar dissolves
- Raise the heat and, without stirring, wait until sugar caramelises and turns amber or golden brown (watch sugar closely, as soon as it turns yellow prepare to remove from heat as it tends to burn quickly)
- Remove from heat and pour in 75 ml thickened cream and whisk well (be careful! the cream will sizzle and spit when it comes in contact with the hot caramel)
- Mix in butter
- Add sea salt as desired
- Put ramekin with gelatin in a small saucepan of simmering water and stir until gelatin completely dissolves and mixture is clear
- Pour gelatin into hot caramel and leave to cool to room temperature
- In a mixing bowl, whip 1 cup of thickened cream until soft but stiff peaks form
- Gently fold cooled caramel-gelatin mixture into whipped cream
- Pour mixture into baked crust and leave to set in fridge for 24h (or at least 8h)
*To decorate:
Pour a thin layer of ganache (1/3 of the amount listed here) over set mousse, tilting the tart such that ganache flows to cover entire surface
Top with fresh raspberries
Refrigerate for 1h before serving
Subscribe to:
Posts (Atom)